Sunday, July 3, 2011

Scalawag's

Scalawag: (noun) a scamp; rascal
(Thanks, dictionary.com!)

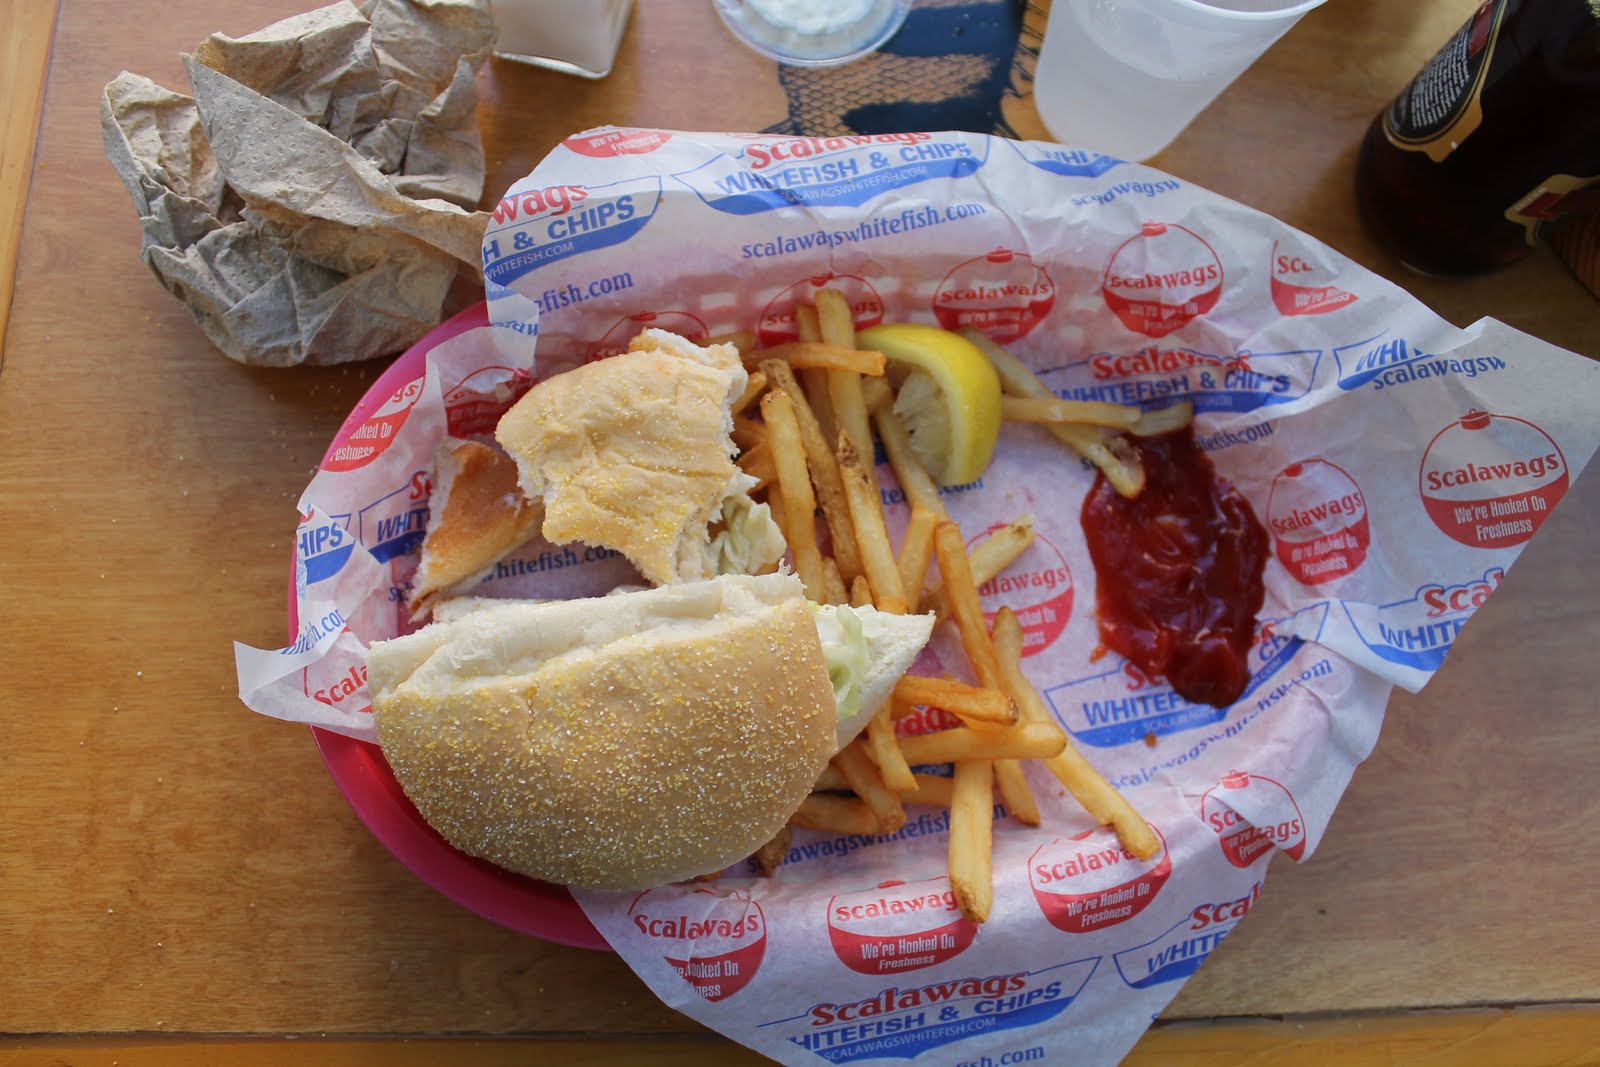
I realize I just posted a picture of a half-eaten basket of fish sandwich and french fries, but I forgot to take a picture before I started eating.

Okay. Fine. I just couldn't wait to take a picture before digging in.

I've been going to Scalawag's for as long as I can remember. Primarily the Mackinaw City location, but when there used to be locations in Cheboygan, Petoskey, and Okemos, I went to those, too. My family used to take boat trips to Mackinaw City, at least once a summer, and we could always count on a trip to Scalawag's and a big ice cream cone to follow. Yes, there have always been tasty treats in Mackinaw.


So here's the low-down on Scalawag's. It's tucked back in a little corner of Mackinaw City. They serve fish. Good fish. They also serve chicken fingers, but don't bother. The FISH is where it's at. I always always always get the fish sandwich basket. So does my dad. It's deliciously deep-fried whitefish on a smooshy white sesame bun with tartar sauce and lettuce. Squeeze a bit of lemon on top (or a lot of lemon) and you have yourself the perfect Great Lakes meal. Granted, Scalawag's is not located on the water, but you could quite simply get it to-go and head on down to the water front.

And oh my god, the FRIES. They're crispy. And hot. And salty. And the perfect accompaniment to the fish. I mean, fish and chips- Classic combo. And here, they do it right. The trick is finding it, though...


1) Look for Kilwin's. (Convenient, because you have to pass it when you leave Scalawag's. May as well grab an ice cream cone)

2) Follow down the corridor next to Kilwin's. See it down there?

3) Jump for joy because you're about to have some seriously tasty whitefish!

S'more, Please!

S'mores

I have been CRAVING s'mores lately. These cravings have been so intense that I almost resorted to cooking them over the grill. I'm sure this would have been fine, but it's not the same. Making s'mores is about so much more than just graham crackers, chocolate, and marshmallow. It's about sitting around a bonfire with special people, searching for the perfect s'more stick, getting sticky and gooey marshmallow all over your hands and face, perfecting your roasting technique. It's about enjoying everything summer has to offer.

I was going to write this post all about how s'mores are simple and perfect and should not be tampered with. However, I'm actually a bit of a stickler when it comes to my ingredients. I'm convinced that you must use Jet-Puffed Marshmallows. The off-brands never seem to puff up quite right over the fire. With graham crackers, I'm a little more lenient. You can get by with an off-brand in a pinch, but I will stand by Honey-Maid until my budget doesn't allow it. As for chocolate, you could probably use any kind of chocolate. But I've never seen a 6-pack of chocolate bars made by anybody but Hershey's.

Going back to my proposal that s'mores are simple and perfect, though: they are. A friend of mine suggested spreading peanut butter on the graham, which was good, but I still prefer the simplicity of the classic s'more.

As for technique... Well, everyone has their own s'more technique. Mine has been perfected over 23 years (minus the years when I wasn't allowed to play near fire). And this past weekend, I finally discovered the perfect ratio. 1 graham cracker sheet (split in half to create the top and the bottom), 3 pieces of chocolate (broken into smaller pieces for maximum meltability), and 2 marshmallows (roasted quickly, browning the outside, and left to hover over the flames, slowly warming the mallow throughout). Yes, it is truly a divine combination.

Whew! Who knew I had so much to say about s'mores!

Let's take a trip to the strawberry patch...


Have you ever bought strawberries at the grocery store? Sometimes they smell pretty good and they look pretty red. Fresh picked strawberries are nothing like those pretty good smelling, red looking strawberries.

Fresh picked strawberries are delicate little morsels. Red, plump, and juicy. They are so juicy. When you have one between your fingers, you can just tell that it's different. The weight of it feels different in your hand. And when you bite into it, it's surprisingly soft. If you've been eating supermarket strawberries, you've probably been experiencing quite a bit of crunch in your strawberries. They're usually firm, almost tough. Fresh picked strawberries practically melt in your mouth. You can smoosh it between the roof of your mouth and your tongue and it releases its sweet juices to run down your throat.


Mom and I started a tradition a couple of summers ago to pick strawberries at a local farm, take the loot home, and make enough jam to last us an eternity. Well, at least enough to last until the next summer. We usually end up with so many strawberries we end up freezing most of them to use later. We just use the recipe in the SureJell box, which uses about 4 cups of sugar per batch. That's a lot of sugar! We ran out of SureJell this time around, but we happened to have a package of a different brand of pectin with a different recipe for jam that used half the sugar. HALF! Well, we gave it a shot, and turns out we might have a new recipe for jam. The new recipe isn't as sweet and tastes more like strawberries. I'm a fan.


Rhubarb is often paired with strawberries, but in my almost 23 years I had not once tried it! Can you believe that? I can't. That's why we made strawberry-rhubarb pie. Like my best friend, Valerie, put it, strawberry-rhubarb pie is the perfect balance of sweet and sour. Considering I've never been a great baker, I'd say it came out pretty darn good!

Friday, July 1, 2011

This is what Heaven looks like

(from Ina Garten)

Ever been to Heaven? If so, this may have been what you saw. I myself have never been to Heaven, but my fingers are crossed that this is what it will look like. Imagine a pint-sized me wandering between the towers of cookies in heavenly bliss. Can you see it?

I decided to bake cookies for the kind young man from my Spanish group for class. He did a bunch of extra work for our group, editing all 4 of our podcasts throughout the course, without a single complaint. What a trooper! I think that deserves some serious cookie action. I had made these cookies from Ina once before and loooooved them so. Anybody can do a chocolate chip cookie. But these backward chocolate chippers (chocolate cookie, white chocolate chips) are such a treat. The cookie part is nice and chocolatey and rich, and the chips are a nice creamy surprise.

Chocolate White Chocolate Chunk (or chip) Cookies
Recipe...

1) Preheat oven to 350℉.

2) Cream 1/2 lb. unsalted butter, 1 c light brown sugar (packed), and 1 c granulated sugar with an electric mixer. Add 2 tsp. vanilla extract, 2 large eggs at room temperature (adding one at a time and mixing well after each addition).

3) Add 2/3 c good cocoa powder and slooowwwllly turn the mixer back on (though I'm pretty sure cocoa powder will get everywhere regardless). Add 2 c flour, 1 tsp. baking soda, and 1 tsp. kosher salt. Mix just until combined. Stir in chocolate chunks/chips, as much as your heart desires.

4) Drop rounded spoonfulls onto a cookie sheet. Dampen your hands and slightly flatten each cookie.

5) Ina says to bake exactly 15 minutes. I say go a bit shy of 15 because every oven is different. Take the cookies out when they SEEM like they need another minute or two. If you wait til them seem done, you'll be sorry.

6) Stack the cookies up in very tall towers and imagine what it would be like to live in a land with towers of cookies.

Thursday, June 30, 2011

Notice a difference?

Nacho Nacho

Do you notice a difference? Do you? See that picture up there? The one that's all pretty and shiny and taken with my BRAND NEW CAMERA??? I've been saving all summer and I was finally able to purchase my Canon Rebel T3. Hooray! Let me tell you, just looking at that picture is making me hungry.

I had intended to make panzanella today, inspired by my new favorite blog, Budget Bytes. I've really only had panzanella once, but it was so delicious that it frequently fills my cloudy, day-dreaming head. Particularly in the summertime. Soooooo, I went to start making the panzanella of my dreams only to find that the left over focaccia I intended to use had far surpassed anything that could be considered acceptable for eating. It was covered in mold and had to be thrown out (always such a sad thing to do). So I resorted back to nachos. I had tortilla chips, leftover refried beans, red onion, shredded cheese, lettuce and salsa. It made a fantastic lunch!

Nacho Nacho
Recipe...

1) Preheat oven to 350℉.

2) Spread refried beans on some tortilla chips and arrange them on a foil-lined cookie sheet.

3) Sprinkle with shredded cheese, red onion, and anything else your heart desires (or that you have in your fridge). Try diced bell peppers, jalapeƱos, olives.

4) Heat in the oven until the cheese gets melty.

5) Use a spatula to scoop the chips onto a plate, or just eat it from the cookie sheet. Be careful not to burn yourself!

6) Serve with lettuce on top and salsa, guacamole, and/or sour cream on the side.

Bowl of Fruit. Life is good.

Bowl of Fruit
(nuf said)

Ever have one of those days when you just feel great? For me, those days usually start with a delicious and healthy breakfast. After a nice long swim at the university pool, I was in serious need of fuel. Luckily, my fridge was full of berries. Oh, those delicious berries. Paired with a bit of greek yogurt and drizzled with raw honey from the farmer's market, you cannot look at the day to come and think anything other than "life is good." Honestly, get me one of those t-shirt guys on the phone because I have a big seller here.

If you haven't started your day with a yummy bowl of fruit lately, I suggest you do so.

P.S. I sprinkled a little All Bran on it for a little crunch and added health benefits.


Saturday, June 11, 2011

Shrimpies

Roasted Shrimp with Feta
(from Ina Garten)

Brother face has been talking about shrimpies for WEEKS now. Really. Weeks.

Me: Brother, what do you want for dinner?
Brother: Shrimpies.
Me: Erm, brother, we don't have any shrimp. What else do you want?
Brother: Hmmm... shrimp.

This is the conversation we've been having repeatedly, so I found a tasty Ina Garten recipe from How Easy is That? and saw to it that shrimp was in my grocery cart on the next trip to Meijer. Yep, we finally had the shrimpies Brother had been persistently craving.

And I'm so glad we did! This recipe is definitely going on my favorites list. You get to sop up the tomato-y sauce with yummy bread and it's lemony and so full of flavor. Plus, it was pretty simple and quick, which is always good in my book.

Fennel seems to be a pretty popular ingredient these days, but I have to say, I'm just not a big fan of it. The black licorice-y flavor has never been my thing. Actually being IN Greece wasn't able to get to enjoy the ouzo. Shame, huh? Anyhow, Ina's recipe calls for fennel and Pernod, which, as I understand it, has a black licorice flavor. Easy fix, though! I used some basil in place of these things to contribute a very light anise (that's the black licorice flavor) flavor without being overpowering. If you don't like basil, though... well, I just don't know what to tell you.

Shrimpies
Recipe...

Serves 4-5

1) Preheat oven to 400℉.

2) Heat 2 Tbsp. EVOO in a large oven-safe skillet over medium-low heat. Add 1/4 c. basil, cut into a chiffonade, and sautƩ for a few minutes. Add 1 Tbsp. minced garlic and cook for 1 minute. Add 1/4 c. dry white wine and bring to a boil, scraping up any browned bits. Cook 2-3 minutes, until liquid is reduced by half. Add 14.5 oz. diced tomatoes and liquid (or whole tomatoes and just mash 'em up a bit with your wooden spoon), 2 tsp. tomato paste, 1 tsp. dried oregano, S&P. Simmer over medium-low heat, stirring occasionally, for 10-15 min.

3) Arrange 1 1/4 lb. shrimp, tails up, in one layer over the tomato mixture in the skillet. Scatter 5 oz. feta cheese evenly over the shrimp. In a small bowl, combine 1 c. bread crumbs, 3 Tbsp. minced fresh parsley, and 1 tsp. lemon zest with 2 Tbsp. EVOO and sprinkle it over the shrimp.

4) Bake for 15 minutes, until shrimp are cooked and bread crumbs are golden. Squeeze the juice of 1 lemon over the shrimp. Serve hot and dip a nice, crusty bread into the tomato sauce.

Sunday, June 5, 2011

Oh, Hey Rachael Ray!

Shish Kebabs with Spanakopita Orzo

I love lamb. Love it. I almost never cook it, though, because it can be a bit out of my almost-nothing price-range. But what the heck? I decided to splurge this week and make a recipe from Rachael Ray's Look + Cook. I'm not normally thrilled by Rachael Ray's recipes, but this one was a hit! The orzo that the lamb skewers were served on top of was surprisingly flavorful, and the entire meal was super simple to prepare. I mean, could it get any better?


Shish Kebabs with Spanakopita Orzo
Recipe...

Serves 4

1) If using wooden skewers, soak them in water for at least 20 minutes.

2) Get your grill started (or preheat your broiler). Bring a large pot of salted water to a boil. Cook 1/2 lb. orzo according to the package directions. Drain the cooked orzo and reserve.

3) While the pasta is cooking, whisk together in a large bowl 1 Tbsp. fresh or 1 tsp. dried oregano, 3 Tbsp. EVOO, 1 tsp. onion powder, 1 tsp. garlic powder, and some S&P. Toss 2 lb. lamb top round or should steaks, evenly cut into bite-sized cubes in the EVOO mixture. Make sure all pieces are well-coated. Thread the cubed lamb onto the skewers. Cook the lamb to your liking.

4) While lamb is cooking, heat a large skillet over medium-high heat with 2 Tbsp. EVOO. Add 1 small onion, finely chopped, and 3-4 cloves of garlic, finely chopped. SautƩ until tender, about 5 min.

5) Meanwhile, put 1/2 cup vegetable stock and 2 cups baby spinach in a food processor and process until smooth. Add the spinach puree to the onions and garlic and heat through, about 30 seconds. Remove from heat and stir in the cooked orzo, 1c baby spinach, 1c crumbled feta cheese, and S&P to taste.

6) When the lamb is done cooking, serve over top of the orzo.

Thursday, June 2, 2011

Operation Recreation

Thai Crunch Salad- Recreated

I went home for the weekend and decided to hit the mall since the weather was just so-so. After piling my arms with clothes from the most GIGANTIC Forever 21 I have ever seen, I went to the dressing room (after having to ask an employee where the heck it was- that's how big the store was) only to realize that I really couldn't face that store alone. I had to call in reinforcements: Mom. My mom is an absolute angel and came to the mall to help me tackle the mountain of clothes I had picked to try on. (I may have bribed her by saying I'd buy her lunch.)

Well, we finally made it out of the store intact and were in serious need of sustenance. We went to one of our favorite mall restaurants: California Pizza Kitchen! We split the Thai Crunch Salad. Have you ever had it? It's sooooo good. So good. The thing about salads at a restaurant is that you always feel like you could make it at home if it weren't for the delicious dressings! Oh, maybe it's just my mom and I that obsessively try to figure out how to make anything we eat in a restaurant. Anyway, I went home and did a little internet research (Thank you, Google) and found a recipe for the dressings for the salad. I have to say, they did a fantastic job recreating the dressings. My salad came out soooo delicious! Here's how ya do it!

Recreated Thai Crunch Salad
Recipe...

1) Pound a chicken breast so that it is an even thickness throughout, allowing it to cook evenly. Marinade it in the refrigerator in 3 T EVOO, 1/2 T soy sauce, and 1 T chopped garlic for 10-20 minutes.

2) Chop some napa cabbage and romaine lettuce (or whatever combination strikes your fancy, though cabbage really makes it great) and put it in a bowl. Add some edamames, chopped carrot, scallions, and avocado.

3) Make the salad dressings... (recipes follow)

4) Cook the chicken in a hot skillet or on a grill. When it is finished, let it sit for a few minutes before cutting it into cubes. Toss it in with the lettuce mixture. Sprinkle some crispy chow mein noodles or rice noodles on top. Drizzle the two dressings on top and dig in!


Thai Peanut Dressing
Recipe...

Makes 1/2 cup

1) In a medium bowl, whisk together 2 Tbsp. creamy peanut butter, 1 Tbsp. seasoned rice vinegar, 1 Tbsp. honey, 1 1/2 tsp water, and 1 1/2 tsp. soy sauce. Be patient. The super thick peanut butter WILL thin out and the ingredients will combine to be smooth.

2) Stir in 1 Tbsp. sugar, 3/4 tsp. kosher salt (add a little at a time because the soy sauce also has plenty of salt in it), 1/4 tsp. cayenne pepper and a pinch of crushed red pepper flakes.

3) Whisk in 1 Tbsp. canola oil until the dressing is smooth.

4) Bring to room temperature and whisk before using.


Lime Cilantro Dressing
Recipe...

Makes 1 cup

1) Combine 1/4 small red bell pepper, cut into small pieces, and 1 small bunch cilantro leaves, coarsely chopped (or leave it out if you don't like cilantro), in a food processor. Add 1 Tbsp. + 2 tsp. honey, 1 Tbsp. + 2 tsp. white vinegar, 1 Tbsp. + 1 1/2 tsp. lime juice, 1 1/2 tsp. light corn syrup, 2 tsp. Dijon mustard, 1/2 tsp. sesame oil, 1/4 tsp. fresh minced ginger, 1/2 tsp. kosher salt, and 1/4 tsp. fresh ground black pepper. Process until smooth.

2) Slowly drizzle 1/2 cup EVOO in with the food processor on.

Sunday, May 15, 2011

Post-Vacation Redemption

I went on a little 3-day vacation to Florida to visit my dear friend, Amaya. She and I always bonded over our LOVE for dessert, so the trip, of course, involved A LOT of sweets. In fact, I think we ate more sweets than actual meals. But that's what vacation is for, right? That's why when you get back from vacation, you have to eat some healthy foods to redeem yourself... and to get rid of that heavy blobby feeling you start to get after Cheetos for lunch and ice cream for breakfast.

I had tucked this recipe away in my "to-make" folder a few weeks ago and it seemed like the perfect time to make it. It's from Cooking Light, so it's gotta be healthy, it simple, quick, etc. Unfortunately, it just wasn't that good. It needed something. Like more salt. Or BACON. Add bacon to anything and I will LOVE it.

Oh, yeah. I couldn't find pappardelle at the grocery store, so I just used linguine.

Thank goodness I had some goat cheese and chive biscuits to go with the pasta...

Monday, April 25, 2011

Okie dokie, artichokie

Artichoke with Vinaigrette

Sometimes, all I want for dinner is an artichoke. That's it. Mom gave me a beaaauuutiful artichoke, so that was dinner. And it was fantastic! I just love the process of eating the artichoke like I love the process of doing a tequila shot (minus the hangover the next day). I love pulling the leaves off, dipping it in the vinaigrette, scraping off the yummy flesh with my teeth. I remember a summer night with my parents where we sat at the Tiki Hut (my dad's "man-cave") and just munched on a couple of artichokes with vinaigrette and called it a night. It was perfect for a hot summer evening when it's too hot to really cook or eat anything heavy.

This recipe has been in the family for a couple of generations, so you know it's a good one.


1) Cut off the tip of the artichoke and the bottom. Snip the tip of each leaf with a pair of kitchen shears.

2) Bring a pot of salted water to a boil and drop in the artichoke with a couple slices of lemon. Let the artichoke boil for 30-45 minutes. The artichoke is done when you can stick a fork in the heart (from the bottom) and it comes out easily. I recommend a fork rather than a sharp knife because a knife will almost always come out easily, even if it isn't fully cooked.

3) Meanwhile, combine a finely chopped shallot and 1/3c finely chopped parsley in a bowl. (I used a food processor to chop the parsley, but I don't recommend it) Add 1/2-1 tsp. dijon mustard, or enough to make a mush (yes, a mush). Slowly drizzle about 3/4c EVOO into the mush, whisking. Add wine vinegar, starting with 2 Tbsp., adding more as needed. Of course, S&P to taste.

Sunday, April 17, 2011

BBQ Chicken Pizza

BBQ Chicken Pizza

Once again, I'm trying to work with that college budget of $0, so I'm using up what I already have. I had some dough in my refrigerator from Artisan Bread in Five Minutes a Day, marinara sauce, and BBQ sauce, so I thought I'd make some pizza. I used to work at CosĆ­ and one of our seasonal items was a BBQ chicken pizza. I kept telling everyone how it was soooo gooooood and they should definitely try it. One day it hit me: I had never myself tasted the pizza. It just smelled so good coming out of the oven that I thought I had tried it. Anyhow, I finally made one and I can confirm that BBQ Chicken Pizza is delicious.

BBQ Chicken Pizza
Recipe...

1) Preheat the oven to 550℉ with a pizza stone on one of the racks. (500℉ will work, too, if your oven doesn't go to 550℉- just cook it a bit longer)

2) Using a grapefruit-sized hunk of dough, create a ball by using the palms of your hands to smooth the dough from the top, pulling toward the bottom. Flatten the dough, using your fingertips, loose fists and/or a rolling pin.

3) Coat a pizza peel or edgeless cookie sheet with cornmeal. Set the flattened pizza dough on top. Remove any excess cornmeal by shaking or brushing with pastry brush.

4) Combine marinara sauce and BBQ sauce about 1:1. Spread some on the pizza dough, being careful not to over-sauce. Sprinkle cheese, like gouda or mozarrella. Add some cooked chicken breast, cubed. Sprinkle some red onion pieces on top.

5) Slide pizza onto the pizza stone with a sliding/flicking motion. Cook for 5-8 min. Check the pizza's progress. Cook another 5 minutes, if needed, until it looks delicious and the crust is golden.

P.S. Sorry about the not-so-good picture. End of the semester makes me start using my phone to take pictures. :/

Mom's BBQ Sauce

Mom's BBQ Sauce

This is my mom's BBQ sauce. You want to make this, seriously. Most people like to go out to eat for their birthday. All I want is barbecue ribs with this sauce. That's it. Corn on the cob and potato salad and watermelon are nice sides (I have a summer birthday), but as long as there are barbecue ribs with Mom's BBQ sauce, I will have a happy birthday. Brother face came home the other night and when I told him I was making barbecue sauce he perked up and said with a little twinkle in his eye, "the kind Mom makes?"
Alright, fine. She found the recipe in an old edition of The Joy of Cooking. It was the first edition she ever bought. It was spiral bound and fast-forward 20-some years and it's falling apart. She bought a new one, but it didn't have the same recipe! Tragic, I know. But we've kept our fists clenched around this recipe. Even though it's so good it should be kept Top Secret, I'm a firm believer that good things should be shared, so I'll let you guys in on the secret...

(Note: Chili sauce usually comes in 12 oz. containers, so it's easier to make 1.5x the recipe and have some leftover- it freezes well)

Mom's BBQ Sauce
Recipe...

Makes about 2 cups
1) SautƩ until brown 1/4 c. chopped onion in 1 Tbsp. drippings (i.e., rendered bacon fat) or butter.

2) Add and simmer for 20 minutes:
  • 1/2 c. water
  • 2 Tbsp. vinegar (cider vinegar is good)
  • 1 Tbsp. woresterchire sauce
  • 1/4c. fresh lemon juice
  • 2 Tbsp. brown sugar
  • 1 c. chili sauce
  • 1/2 tsp. salt
  • 1/4 tsp. paprika
  • 1 tsp. pepper
  • 1 tsp. yellow mustard
Simple, right?

Friday, April 8, 2011

Brother's Birthday Dinner

Roasted Chicken


Brother's birthday was on Thursday and I decided to make a nice dinner for him to enjoy when he got back from the big scary law library. I had been planning to bake him cookies (chocolate chip, of course), so dessert was covered. This also happened to be the day that I realized I had $0 left for groceries, soooo I had to be a little frugal. Hence...

...roasted chicken! So versatile! Sure, you can buy a rotisserie chicken at your supermarket for $5 or so, but it's much more economical to roast a chicken yourself. Granted, if you're low on time, it's quicker to just get one that's already made. Roasting a chicken, though, takes about 10 minutes of prep work and then you just pop that baby in the oven. Really!

Roasted Chicken
Recipe...

1) Preheat oven to 400℉ if using a non-glass baking dish or roasting pan. Preheat to 350℉ if using a glass pan.
2) Rinse the chicken in cold water and pat dry with paper towel.
3) Place in a foil-lined roasting pan or baking dish. Stuff the chicken with a quartered onion, lemon slices, fresh herbs, or whatever you have.
4) Rub with butter and season with Seasoned Salt and black pepper on the inside and outside.
5) Roast the chicken about 15 minutes per pound. Use a meat thermometer to check the chicken.


So what do you do once you've roasted that chicken?
Well, you could eat it as is with a side dish of some sort. You could serve it with BBQ sauce. Save the leftovers to add some protein to a salad, make chicken salad, a BBQ chicken sandwich, add some to your chicken-flavored Top Ramen. :)

Next on the blog line-up... Mom's BBQ sauce. Keep an eye out for it!

Thursday, April 7, 2011

Improv Pantry Pasta

Improv Pantry Pasta

So I spent all my grocery money for this month, so I've really been trying to use that I already have. I made this pasta entirely out of things that I already had around the house. I mean, you should always have pasta in the pantry because you can put almost anything in it. Remember this? This marinara sauce has been super handy! Seriously. It turned into another pasta, chicken parmesan, this pasta, and a barbecue chicken pizza (more on that later!).
The dish on this pasta is basically just that I looked in the cupboard, the fridge, and the freezer to see what I had to work with. I found marinara, frozen artichokes, onion, angel hair pasta, baby spinach, parmesan cheese... I actually wasn't so sure how this all would turn out, but the flavors came together really well! Everything about this recipe is improvised, so there really aren't any measurements. Just use what you have and how much you want.


Improv Pantry Pasta
Recipe...

1) Heat a skillet over medium heat. Add a little butter and/or EVOO. Add sliced onion. Let them caramelize (ie: don't move them around to much- it's a fine balance to leave them long enough to caramelize, but not so long they burn). Add a little salt at the end.

2) Boil water, salt it well, and cook some angel hair pasta (or whatever you have). Heat some marinara sauce in a saucepan on the stove or in the microwave.

3) Defrost frozen artichokes in the microwave.

4) Roughly chop baby spinach a little bit (don't overdo it!).

5) When the onions are a nice golden color, remove from the pan. Add a little more oil and the artichokes. Let them brown, stirring occasionally.

6) Add the cooked pasta, onions, marinara sauce (a little bit at a time), and baby spinach. Let the spinach wilt a little bit and add sauce to taste. Shave a little parmesan cheese over the top (try using a vegetable peeler).

Wednesday, April 6, 2011

Chicken and Wild Rice Soup update

Remember this?

I froze the leftovers of the Chicken and Wild Rice soup, but my mom warned me that the rice might disintegrate in the thawing process. Well, the rice may have fallen apart a little bit, but still pretty darn good! My advice, make the soup, freeze the leftovers, thaw it when you need a quick lunch on a rainy day.

Sunday, April 3, 2011

Taking my pantry for all it's worth...

Guess who spent all of April's grocery money before April even began...
I DID!

This is not something I'm proud of. I now have a few tasks to accomplish:
1) Figure out how I'll pay for groceries this month.
2) Spend as little as possible on groceries this month.
3) Remedy my spending habits.
4) Use what I have as much as possible.

My first tactic is going to be to identify the cheap foods. Lots of veggies are cheap, like lettuce and carrots. Carrots make a great snack. Especially with dip! Bananas are also very cheap. You can get like 6 bananas for about $1. Pasta and rice are pretty cheap considering how much you can get out of them. By the end of this month, I expect to have scoured the grocery store for the cheapest products they have.

The foods between your knee caps and your eyeballs at the grocery store are the most expensive. Check out the top and bottom shelves for the cheap foods. Seriously. Get down on those hands and knees and crawl around a little if you have to!

You know those fliers at the front when you walk into the supermarket? They put those there to tell you what's on sale in the store. (Yes, this was a revelation I had today) Take a look through that thing to get a feel for what's cheap that week and find inspiration for upcoming meals.

Keep an eye out for more updates on how to eat cheap, use what you already have, and do minimal spending!

Thursday, March 31, 2011

Lookie what I got...

Skilletini with Peppers

Guess who bought their very first cast-iron skillet? I DID! I DID! I'm obviously very excited about it and I'm looking for every opportunity to season it. Mom told me to rub a generous amount of vegetable oil in it and stick it in a 300℉ oven to start the seasoning process. I was also doing this because I was making a skilletini. Every time I see the word 'skilletini', I think of skeletons. But don't worry! This recipe has nothing to do with skeletons and everything to do with being tasty!

Skilletini with Peppers
Recipe...

1) Preheat oven to 300℉. Place a cast-iron skillet in the oven. Boil water for pasta. Salt well. When water is boiling, add spaghetti. Heat marinara sauce in a saucepan over medium-low heat.

2) Warm some EVOO in a pan. Cut some sausage (bratwurst, Italian sausage... you pick) into thirds and add it to the pan. Cook until nicely browned on the outside and cooked through. Remove from pan and reserve.


3) Meanwhile, cut up two bell peppers, whichever color(s) you prefer, into strips. Cut an onion into strips (I forgot this step and it was good without it, but I love onions). Add more EVOO to the pan the sausage was in. Once it's hot, add the peppers and onion. Make sure to add some S&P. Cook until tender.

4) When pasta and peppers are finished cooking, put spaghetti, peppers, sausage, marinara, and some grated parmesan cheese. Mix everything together and put back in the oven for 10 minutes.

And voila!
You have a skilletini.
Pretty fun way to start seasoning your cast-iron skillet, right?

Sunday, March 20, 2011

What to do with the leftovers...?

Steak and Fruit Salad

I have a refrigerator filled with leftovers. Lots of odds and ends like baby spinach and romaine lettuce from Mom, grapes, cantaloupe, apple, last night's steak, leftover mahi mahi. I don't want any of it to go to waste, so I combined some of it to make a tasty salad! Salads are great because 1) you can put almost anything on them and 2) they're easy to make.

One of the dorms I lived in would serve a salad with bleu cheese, grapes, steak, red onion, roasted red peppers, and green apple. It sounds like a sort of unusual combination of flavors, but it was delicious! I decided to recreate something like that by combining baby spinach, a little bit of romaine for crunch, dried cherries and cranberries, apple slices, steak pieces, walnuts, red onion, and feta cheese. It really came out great!

Saturday, March 19, 2011

German Translation

Steak and Mediterranean Bulgar Salad

I was reading a blog that I came across recently called la petite cuisine. I have no idea where I found it or why I was initially attracted to it, but it's really lovely... and in German. Google, however, translated it for me! La petite cuisine was featuring some favorite blogs (I think), one of which was Ohhh... Mhhh..., also in German. I couldn't figure out how to get Google to translate this one, though. The picture on la petite cuisine accompanying the blurb about Ohhh... Mhhh... was this and it looked delicious! Maybe it's because I have Spring Fever (big time), but it looked light and summery and healthy. Just perfect. Only one problem: I couldn't read the website to find the recipe. But just from looking at the picture I thought "I can totally make that." Mom was visiting, so we hit the grocery store and got some dinner supplies...

The original plan was to use this bulgar wheat salad as a side to a yummy lamb dish from Ellie Krieger, but when we got to the grocery store, the lamb selection was minimal (to say the least) and EXPENSIVE. Did you know lamb is expensive? It is. Even on a college-kid-whose-mom-is-paying budget. We changed gears and bought 3 steaks. The steak selection also left much to be desired, so we ended up with a regular-thickness Ribeye and two thin-cut Ribeyes. My first thought about the thin-cut steaks was "meh." They looked like what my brother would call steak-ums. They still looked a little funny when they came off the grill, but Mom cooked them PERFECTLY and they stayed juicy and delicious. We're all about the simple steak preparation, so all we did was rub a little EVOO on both sides, add lots of salt and a whole bunch of pepper. That's it.

Oh, by the way, this meal was Q.U.I.C.K. Seriously. I think it took a total of 30 or 45 minutes to put it together.


Mediterranean Bulgar Salad
Recipe...

Ingredients:
1/2c. (dry measure) bulgar wheat
1 shallot, 1/2 minced, 1/2 in larger slices
1 zucchini or yellow squash, cut into bite-sized pieces
Olive oil
1 large roasted red pepper, cut into bite-sized pieces
1 1/2 Tbsp. pine nuts
1/8c. feta cheese crumbles
1 lemon
oregano (dried)

1) Cook the bulgar wheat according to package directions.
(You might notice that our bulgar turned out a little mushy. We're thinking it may have turned out better if we had followed the directions for making tabbouleh- cover bulgar wheat in a bowl with hot water and let sit for a while.)

2) Chop up half a shallot into larger pieces, one zucchini or yellow squash into bite-sized pieces. Heat a pan until quite warm, coat with EVOO and let them warm until it's hot enough that when you put the vegetables in, it will sizzle and the veggies will cook quickly. Cook until tender. In another pan, toast about 1 1/2 Tbsp. pine nuts.

3) Meanwhile, chop roasted red peppers into bite-sized pieces. Add to the cooked bulgar wheat. Add cooked zucchini or yellow squash and shallot. Crumble in some feta cheese (this is a good place to use reduced-fat feta). Add as much feta as is appetizing. We found that we did not need very much. Add toasted pine nuts.

4) Whisk together 1/4c. lemon juice (about 1/2 lemon), 1/2 minced shallot, 1 Tbsp. EVOO, a pinch of salt, and 1/2 tsp. dried oregano. Add this mixture to the bulgar salad a little bit at a time. Note: You can always add more, but I'd love to see you try to take some out. We used about half of the mixture.

Friday, March 18, 2011

Kudos

Remember that time I started a blog all about the food I'm cooking? And remember how it really wasn't looking so good for awhile because it was just so bland? And then I found out how to customize the design and remember how that was a disaster because I had no idea what I was doing?

Well... Miss Sarah Gabler has saved my blog and made it shine like a pretty new penny! Sarah is a college friend of mine who has this really awesome design blog, design me daily. Seriously, she's great. I check her blog everyday. Multiple times. Is that creepy?

Anyhow, kudos to Sarah for being a doll and rescuing my blog from design purgatory.

Thursday, March 17, 2011

Lemony Chicken, Inspired by Ina

Lemony Chicken
(inspired by Ina)

During that wonderful week we like to call Spring Break, when the powers that be give you a reprieve from classes (yet still manage to crush your conscience with the homework and papers that are due immediately following) and you travel to (read: dream of) tropical lands, there is sure to be delicious food. I, however, seem to have only this to show for it. I'm sure we ate. I'm sure of it. I just can't seem to remember what it was. Anyhow, this quick chicken recipe came together so differently and so much better than we ever expected! Seriously, it was delicious.

We found a recipe in a cookbook from Ina Garten for lemony chicken with rosemary. Mom and I decided this was a great meal for us because we had been running errands all day (alright, fine, we were at the mall all day) and we just wanted something quick and we didn't want to have to go to the grocery store if we could avoid it. Mom already had chicken, lemons, and some leftover rosemary, so it was settled! Remember what I told you before? How you should always read through your recipe carefully before you start preparing? Well, we got home, read the recipe more closely, and found out the chicken was supposed to marinate for something like 8 hours. HA! We didn't have the foresight for that one. We did, however, have two inspired ladies in the kitchen, so we changed the recipe up a little bit. Here's what we did...

1) Start heating a cast iron skillet over medium heat. You can use other kinds of pans for this, but cast iron really browns the outside of the chicken into a beautiful crust. I made this again at my apartment with a different kind of pan and it just wasn't the same. Coat the pan with a little olive oil and let it warm. Season your chicken pieces with S&P.

2) Place the chicken pieces in the skillet and enjoy the awesome sizzling sound they make when you put them in the hot oil. Meanwhile, juice and zest some lemons. I'd say juice about 3 lemons if you're making a serving for 4, but you only need the zest from one of the lemons.

3) When the chicken is cooked through, remove from the pan and keep them warm in a low oven. Add the lemon juice and deglaze the pan, using a wooden spoon to scrape up the delicious brown bits left behind fromthe chicken. Add a little white wine (as much as you see fit) and some chopped rosemary, about 1 tsp. or so.

4) Make a slurry by combining cornstarch and water. We usually put about 1 Tbsp. cornstarch and 2 Tbsp. water in a small tupperware, put the lid on, and shake, shake, shake! If it sounds like fun, that's because it is. Whisk the slurry into the pan and bring to a boil. Once it boils, reduce the heat and add a pad of butter. Once the butter has melted, pour this sauce over the already cooked chicken and gobble it up!


someone couldn't keep their hands off the food long enough to get a picture. :)